1. Common Hooks (Hooks 종류)
- React는 더 효율적인 React 코드를 작성할 수 있는 많은 Hooks를 지원함
- React Hooks Reference
- Basic Hooks (useState, useEffect) → 09에서 다룸
- useRef → 10에서 다룸
- useContext & Context API
- useMemo
- useCallback
- useReducer…
- Custom Hook 만들기
2. useContext & Context API
React로 만든 앱은 여러 개의 컴포넌트로 구성됩니다.
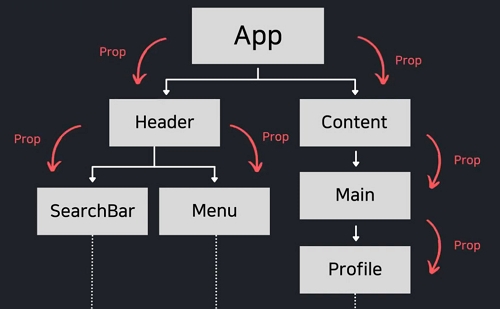
- 최상위 App 컴포넌트
- 그 아래 Tree 형태로 컴포넌트들이 구성되며, 데이터 흐름은 위에서 아래로
- 부모 컴포넌트에서 자식 컴포넌트로 prop를 통해 데이터가 전달됨
1// App 컴포넌트2<Header user={user} />34// ---------------------------5// Header 컴포넌트6<SearchBar user={user} />

그러다 모든 컴포넌트에서 사용하는 전역적인 데이터가 필요할 수 있습니다. (e.g. 현재 로그인된 사용자 정보, 테마, 언어)
props로 일일히 단계별로 데이터를 전달해여 한다면, 매우 고통스러울 겁니다. (이를 Prop Drilling이라고 함)
코드도 복잡해지고, 뭐 하나 바뀌면 일일히 컴포넌트를 찾아가서 수정해줘야 할 겁니다.
2.1 Context API
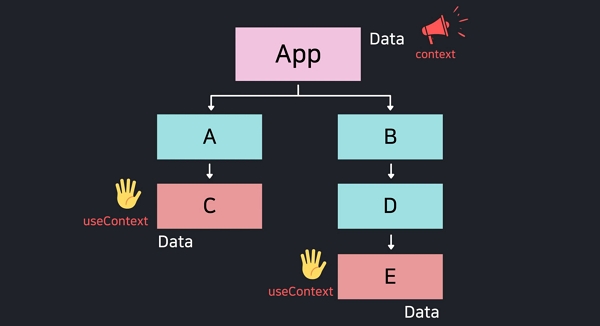
React는 Context를 제공하면서 위 문제를 해결해줍니다.
- Context = 앱 안에서 전역적으로 사용되는 데이터들을 여러 컴포넌트끼리 쉽게 공유하는 방법을 제공
- 맨 아래 C, E 컴포넌트에만 데이터가 필요하면,
useContext사용하면 됨 Context는 꼭 필요할 떄만 사용!- Context를 사용하면 컴포넌트를 재사용하기 어려워 질 수 있음
- Prop Drilling을 피하기 위한 목적이라면,
Component Composition(컴포넌트 합성)을 먼저 고려
2.2 예제1 : Context 사용 전
2.2.1 폴더구조
1📦 src2├─ components3│ ├─ Content.jsx4│ ├─ Footer.jsx5│ ├─ Header.jsx6│ └─ Page.jsx7├─ App.css8└─ App.js
2.2.2 Content.jsx
1import React from 'react'23export default function Content({ isDark }) {4return (5<div6className="content"7style={{8backgroundColor: isDark ? 'black' : 'lightgray',9color: isDark ? 'white' : 'black',10}}11>12<p>메시님, 안녕하세요!</p>13</div>14)15}
2.2.3 Footer.jsx
1import React from 'react'23export default function Footer({ isDark, setIsDark }) {4const toggleTheme = () => {5setIsDark(!isDark)6}7return (8<footer className="footer" style={{ backgroundColor: isDark ? 'black' : 'lightgray' }}>9<button className="button" onClick={toggleTheme}>10Dark Mode11</button>12</footer>13)14}
2.2.4 Header.jsx
1import React from 'react'23export default function Header({ isDark }) {4return (5<header6className="header"7style={{8backgroundColor: isDark ? 'black' : 'lightgray',9color: isDark ? 'white' : 'black',10}}11>12<h1>Welcom 메시!</h1>13</header>14)15}
2.2.5 Page.jsx
1import React from 'react'2import Header from './Header'3import Content from './Content'4import Footer from './Footer'56export default function Page({ isDark, setIsDark }) {7return (8<div className="page">9<Header isDark={isDark} />10<Content isDark={isDark} />11<Footer isDark={isDark} setIsDark={setIsDark} />12</div>13)14}
2.2.6 App.css
1* {2box-sizing: border-box;3margin: 0;4font-family: sans-serif;5}67.page {8width: 100%;9height: 100vh;10display: flex;11flex-direction: column;12}1314.header {15width: 100%;16height: 80px;17border-bottom: 2px solid gray;18display: flex;19justify-content: center;20align-items: center;21}2223.content {24flex: 1;25display: flex;26justify-content: center;27align-items: center;28font-size: 30px;29}3031.footer {32width: 100%;33height: 80px;34border-top: 2px solid gray;35display: flex;36justify-content: flex-end;37align-items: center;38}3940.button {41padding: 10px;42margin-right: 30px;43}
2.2.7 App.js
1import React, { useState } from 'react'2import './App.css'3import Page from './components/Page'45function App() {6const [isDark, setIsDark] = useState(false)78return <Page isDark={isDark} setIsDark={setIsDark} />9}1011export default App
2.3 예제1 : Context 사용 후
2.3.1 폴더 구조
1📦 src2├─ components3│ ├─ Content.jsx4│ ├─ Footer.jsx5│ ├─ Header.jsx6│ └─ Page.jsx7├─ context # 추가8│ ├─ ThemeContext.jsx9│ └─ UserContext.jsx10├─ App.css11└─ App.js
2.3.2 Context
1// ThemeContext.jsx2import { createContext } from 'react'34export const ThemeContext = createContext(null)56// -------------------------------------------------------7// UserContext.jsx8import { createContext } from 'react'910export const UserContext = createContext(null)
2.3.3 Context 적용 : App.js
1import { ThemeContext } from './context/ThemeContext'2import { UserContext } from './context/UserContext'34export default function App() {5const [isDark, setIsDark] = useState(false)67return (8// 모든 하위 컴포넌트에 value의 값을 전달9<UserContext.Provider value={'사용자'}>10<ThemeContext.Provider value={{ isDark, setIsDark }}>11<Page />12</ThemeContext.Provider>13</UserContext.Provider>14)15}
2.3.4 Context 적용 : components들
1export default function Content() {2const { isDark } = useContext(ThemeContext)3const user = useContext(UserContext)45return (6<div7className="content"8style={{9backgroundColor: isDark ? 'black' : 'lightgray',10color: isDark ? 'white' : 'black',11}}12>13<p>{user}님, 안녕하세요!</p>14</div>15)16}
1export default function Footer() {2const { isDark, setIsDark } = useContext(ThemeContext)34const toggleTheme = () => {5setIsDark(!isDark)6}78return (9<footer className="footer" style={{ backgroundColor: isDark ? 'black' : 'lightgray' }}>10<button className="button" onClick={toggleTheme}>11Dark Mode12</button>13</footer>14)15}
1export default function Header() {2const { isDark } = useContext(ThemeContext)3const user = useContext(UserContext)45// console.log(user);67return (8<header9className="header"10style={{11backgroundColor: isDark ? 'black' : 'lightgray',12color: isDark ? 'white' : 'black',13}}14>15<h1>Welcom {user}!</h1>16</header>17)18}
1export default function Page() {2return (3<div className="page">4<Header />5<Content />6<Footer />7</div>8)9}
3. useMemo
컴포넌트의 성능 최적화(Optimization)에 사용되는 대표적인 Hook은 다음과 같습니다.
- useMemo
- useCallback
3.1 개념
useMemo에서 memo는 Memoization(메모이제이션)을 의미
Memoization- 동일한 값을 리턴하는 함수를 반복적으로 호출해야 한다면,
- 맨 처음 값을 계산할 떄, 해당 값을 메모리에 저장해서, 필요할 때마다 또 다시 계산하지 않고
- 메모리에서 꺼내서 재사용을 하는 기법
- 쉽게 말해, 자주 사용하는 값을 캐싱을 해둬서 그 값이 필요할 떄마다 다시 계산하는게 아니라 꺼내서 쓰는 것
3.1.1 함수형 컴포넌트의 문제점
렌더링 될 때마다, Component 함수를 호출 → 모든 내부 변수 초기화
1function Component() {2const value = calculate() // 렌더링될 떄마다, calculate가 반복호출됨 -> 성능이 느려짐(비효율적)3return <div>{value}</div>4}56function calculate() {7return 108}
useMemo를 사용하면, 위 문제를 해결할 수 있습니다.
- 렌더링 →
Component 함수 호출, Memoization→ 렌더링 →Component 함수 호출, Memoize된 값을 재사용
1// 렌더링2function Component() {3const value = useMemo(() => calculate(), [])4return <div>{value}</div>5}67function calculate() {8return 109}
3.1.2 useMemo 구조
1// useMemo(콜백함수, 의존성배열)2// - 콜백함수 : 메모이제이션해서 리턴해줄 함수3// - 의존성 배열 : 요소의 값이 업데이트될 떄만 콜백함수를 다시 호출4// -- 메모이제이션된 값을 업데이트해서 다시 메모이제이션해줌5// -- 빈 배열을 넘겨주면, 컴포넌트가 mount되었을 때만 값을 계산하고, 이후에는 항상 메모이제이션된 값을 꺼내씀6const value = useMemo(() => {7return calculate()8}, [item])
useMemo 역시 무분별하게 사용하면, 오히려 성능에 무리가 갑니다. 꼭 필요할 떄만 씁시다. useMemo를 쓴다는 건, 값을 재활용하기 위해, 따로 메모리를 소비해서 저장해놓는 것을 의미하기 때문에, 불필요한 값까지 메모이제이션을 한다면, 오히려 성능이 악화될 수 있음
3.2 예제1
1import React, { useMemo, useState } from 'react'23const hardCalculate = number => {4console.log('어려운 계산!')5for (let i = 0; i < 999999; i++) {} // 생각하는 시간6return number + 100007}89const eashCalculate = number => {10console.log('짱 쉬운 계산!')11return number + 112}1314export default function App() {15const [hardNumber, setHardNumber] = useState(1)16const [easyNumber, setEashNumber] = useState(1)1718// const hardSum = hardCalculate(hardNumber);1920// 1. hardNumber가 변경될 떄만 hardCalculate가 다시 호출됨21// 2. hardNumber가 변경되지 않으면, 그 전에 갖고있던 hardNumber의 값을 재사용함22const hardSum = useMemo(() => {23return hardCalculate(hardNumber)24}, [hardNumber])25const easySum = eashCalculate(hardNumber)2627return (28<div>29<h3>어려운 계산기</h3>30<input type="number" value={hardNumber} onChange={e => setHardNumber(parseInt(e.target.value))} />31<span>+ 10000 = {hardSum}</span>32<h3>쉬운 계산기</h3>33<input type="number" value={easyNumber} onChange={e => setEashNumber(parseInt(e.target.value))} />34<span>+ 1 = {easySum}</span>35</div>36)37}
3.3 예제2
1import React, { useEffect, useMemo, useState } from 'react'23export default function App() {4const [number, setNumber] = useState(0)5const [isKorea, setIsKorea] = useState(true)67// 1. JS 타입 종류 : 원시타입 | 객체타입(원시타입을 제외한 모든 것, Object, Array)8// - 어떤 변수에 객체타입을 할당하면, 객체타입이 크기가 크기 때문에9// - 메모리 상에 공간이 할당되어 저장되고, 변수에는 메모리 주소가 할당됨10// - 똑같은 객체를 할당해도, 두 메모리 주소가 다르기 때문에 ===을 하면 false 나옴11const location = useMemo(() => {12return {13country: isKorea ? '한국' : '외국',14// 뭔가 오래걸리는 작업을 해야한다면, 꼭 필요할 떄만 호출15}16}, [isKorea])1718useEffect(() => {19console.log('useEffect 호출')20}, [location])2122return (23<div>24<h2>하루에 몇끼 먹어요?</h2>25<input type="number" value={number} onChange={e => setNumber(e.target.value)} />26<hr />27<h2>어느 나라에 있어요?</h2>28<p>나라 : {location.country}</p>29<button onClick={() => setIsKorea(!isKorea)}>비행기 타자</button>30</div>31)32}
4. useCallback
컴포넌트의 성능 최적화(Optimization)에 사용되는 대표적인 Hook은 다음과 같습니다.
useMemo= 특정 함수를 새로 만들지 않고 재사용하고 싶을 때 사용하는 함수useCallback= 특정 함수를 새로 만들지 않고 재사용하고 싶을 때 사용하는 함수
Memoization
- 동일한 값을 리턴하는 함수를 반복적으로 호출해야 한다면,
- 맨 처음 값을 계산할 떄, 해당 값을 메모리에 저장해서, 필요할 때마다 또 다시 계산하지 않고
- 메모리에서 꺼내서 재사용을 하는 기법
- 쉽게 말해, 자주 사용하는 값을 캐싱을 해둬서 그 값이 필요할 떄마다 다시 계산하는게 아니라 꺼내서 쓰는 것
4.1 개념
useMemo 복습
1// useMemo(콜백함수, 배열)2// - 콜백함수 : 메모이제이션해서 리턴해줄 함수3// - 배열 : 의존성 배열이라고 불림, 요소의 값이 업데이트될 떄만 콜백함수를 다시 호출4// -- 메모이제이션된 값을 업데이트해서 다시 메모이제이션해줌5// -- 빈 배열을 넘겨주면, 컴포넌트가 mount되었을 때만 값을 계산하고, 이후에는 항상 메모이제이션된 값을 꺼내씀6useMemo(() => {7return value8}, [item])
useMemo와 비슷하지만, useCallback은 인자로 전달한 콜백함수 그 자체를 메모이제이션해줌
useMemo= 콜백함수가 리턴하는 값을 메모이제이션해줌useCallback= 인자로 전달한 콜백함수 그 자체를 메모이제이션해줌
1const calculate = useCallback(2num => {3return num + 14},5[item],6)7// calculate()를 메모이제이션해준다면, useCallback으로 감싸주면 됨8// 그러면 calculate()가 필요할 때마다 함수를 새로 생성하는 것이 아니라,9// 필요할 떄마다 메모리에서 가져와서 재사용함
참고로 JS에서 함수는 사실 객체의 한 종류입니다.
- React에서 함수형 컴포넌트는 말 그대로 함수이기 때문에,
렌더링 → Component 함수 호출 → 컴포넌트의 모든 내부 변수 초기화
1// 함수형 컴포넌트 안에2// calculate변수에 num을 인자로 받는 함수(객체)가 할당되어 있는 형태3function Component() {4const calculate = num => {5return num + 16}7return <div>{value}</div>8}
useCallback으로 메모이제이션을 해주면,
렌더링 → Component 함수 호출 → Memoize된 함수를 재사용- 즉, 컴포넌트가 다시 렌더링되더라도 calculate가 초기화되는 것을 막을 수 있음
- 컴포넌트가 맨 처음 렌더링될 떄만 함수를 만들어서 calculate를 초기화해주고,
- 이후에 렌더링될 떄는 calculate 변수가 새로운 함수 객체를 할당받는게 아니라,
- 이전에 받은 함수 객체를 계속 갖고있으면서 재사용함
1function Component() {2const calculate = useCallback(3num => {4return num + 15},6[item],7)8return <div>{value}</div>9}
4.1.1 useCallback 구조
1// useCallback(메모이제이션해줄 콜백함수, 의존성배열)2const calculate = useCallback(3num => {4return num + 15},6[item],7)8// calculate는 메모이제이션된 함수(객체)르 갖게됨9// 의존성배열의 값(=item)이 변경되지 않는 이상 다시 초괴화되지 않음
4.2 예시1
1import React, { useCallback, useEffect, useState } from 'react'23export default function App() {4const [number, setNumber] = useState(0)5const [toggle, setToggle] = useState(true)67const someFunction = useCallback(() => {8console.log(`someFunc: number: ${number}`)9return10}, [number])1112useEffect(() => {13console.log('someFunction이 변경되었습니다.')14}, [someFunction])1516return (17<div>18<input type="number" value={number} onChange={e => setNumber(e.target.value)} />19<button onClick={() => setToggle(!toggle)}>{toggle.toString()}</button>2021<button onClick={someFunction}>Call someFunc</button>22</div>23)24}
4.3 예시2
1import React, { useEffect, useState } from 'react'23export default function Box({ createBoxStyle }) {4const [style, setStyle] = useState({})56useEffect(() => {7console.log('박스 키우기')8setStyle(createBoxStyle())9}, [createBoxStyle])1011return <div style={style}></div>12}
1import React, { useCallback, useState } from 'react'2import Box from './Box'34export default function App() {5const [size, setSize] = useState(100)6const [isDark, setIsDark] = useState(false)78const createBoxStyle = useCallback(() => {9return {10backgroundColor: 'pink',11width: `${size}px`,12height: `${size}px`,13}14}, [size])1516return (17<div style={{ background: isDark ? 'black' : 'white' }}>18<input type="number" value={size} onChange={e => setSize(e.target.value)} />19<button onClick={() => setIsDark(!isDark)}>Change Theme</button>20<Box createBoxStyle={createBoxStyle} />21</div>22)23}
5. useReducer
useReducer : 여러 개의 복잡한 하위 state를 다뤄야 할 때, useState대신 useReducer를 사용하면 편리
- 다양한 컴포넌트 상황에 따라 다양한 상태를 다른 값으로 업데이트해주고 싶을 때 사용하는 Hook
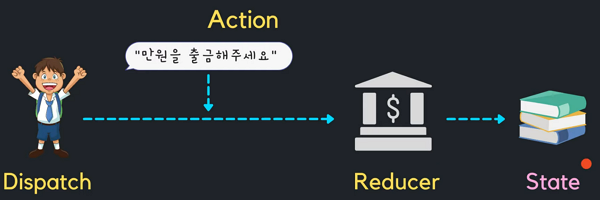
useReducer는 다음 3가지로 구성됨
Reducer: state를 업데이트 해주는 역할- e.g. 거내내역(state)를 업데이트해주는 은행
Dispatch: Reducer에게 요구를 하는 역할- e.g. 은행에 거래내역을 업데이트해달라고 요청하는 고객
Action: Reducer에게 요구하는 내용- e.g. 고객이 은행에게 “만원을 출금해달라”라는 행동
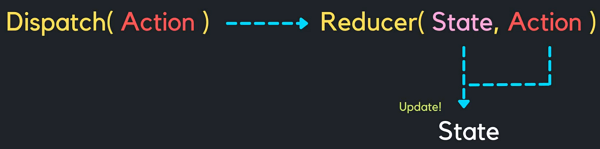
이를 컴포넌트 관점에서 보면 위 그림과 같습니다.
5.1 예제 1 : 은행
1import React, { useReducer, useState } from 'react'23// reducer - state를 업데이트하는 역할(은행)4// dispatch - state를 업데이트하는 요구5// action - 요구하는 내용67const ACTION_TYPES = {8deposit: 'deposit',9withdraw: 'withdraw',10}1112const reducer = (state, action) => {13console.log('reducer가 일을 합니다!', state, action)14switch (action.type) {15case ACTION_TYPES.deposit:16return state + action.payload17case ACTION_TYPES.withdraw:18return state - action.payload19default:20return state21}22}2324export default function App() {25const [number, setNumber] = useState(0)26const [money, dispatch] = useReducer(reducer, 0) // reducer, 초기값2728return (29<div>30<h2>useReducer 은행에 오신 것을 환영합니다.</h2>31<p>잔고: {money}원</p>32<input type="number" value={number} onChange={e => setNumber(parseInt(e.target.value))} step="1000" />33<button onClick={() => dispatch({ type: ACTION_TYPES.deposit, payload: number })}>예금</button>34<button onClick={() => dispatch({ type: ACTION_TYPES.withdraw, payload: number })}>출금</button>35</div>36)37}
5.2 예제 2 : 출석부(복잡한 state)
1import React from 'react'23export default function Student({ name, dispatch, id, isHere }) {4return (5<div>6<span7style={{8textDecoration: isHere ? 'line-through' : 'none',9color: isHere ? 'grey' : 'black',10}}11onClick={() => dispatch({ type: 'mark-student', payload: { id } })}12>13{name}14</span>15<button onClick={() => dispatch({ type: 'delete-student', payload: { id } })}>삭제</button>16</div>17)18}
1import React, { useReducer, useState } from 'react'2import Student from './Student'34const reducer = (state, action) => {5switch (action.type) {6case 'add-student':7const name = action.payload.name8const newStudent = {9id: Date.now(),10name,11isHere: false,12}13return {14count: state.count + 1,15students: [...state.students, newStudent],16}17case 'delete-student':18return {19count: state.count - 1,20students: state.students.filter(student => student.id !== action.payload.id),21}22case 'mark-student':23return {24count: state.count,25students: state.students.map(student => {26if (student.id === action.payload.id) {27return { ...student, isHere: !student.isHere }28}29return student30}),31}32default:33return state34}35}3637const initialState = {38count: 0,39students: [],40}4142export default function App() {43const [name, setName] = useState('')44const [studentsInfo, dispatch] = useReducer(reducer, initialState)4546return (47<div>48<h1>출석부</h1>49<p>총 학생 수 : {studentsInfo.count}</p>50<input type="text" placeholder="이름을 입력하세요" value={name} onChange={e => setName(e.target.value)} />51<button onClick={() => dispatch({ type: 'add-student', payload: { name } })}>추가</button>52{studentsInfo.students.map(student => {53return (54<Student key={student.id} name={student.name} dispatch={dispatch} id={student.id} isHere={student.isHere} />55)56})}57</div>58)59}
6. React.memo로 컴포넌트 최적화
굳이 렌더링될 필요없는 Component가 계속 반복적으로 렌더링된다면, 또 그 반복적으로 렌더링된 Component가 복잡한 로직이라면, Component 성능이 최악일 것입니다.
이를 해결하기 위해 React.memo(ft. useMemo, useCallback)를 활용할 수 있습니다. Reaec는 기본적으로 부모 컴포넌트가 렌더링되면, 모든 자식 컴포넌트들도 자동으로 렌더링됩니다. 만약 부모 컴포넌트가 자주 렌더링되는 컴포넌트라면, 자식 컴포넌트는 렌더링될 필요가 없음에도 렌더링됩니다. 그래서 렌더링 횟수를 제한해줄 필요가 있습니다. 여기서 React.memo를 사용하면 됩니다.
고차 컴포넌트(Higher-Order Component; HOC)- 어떤 컴포넌트를 인자로 받아서, 새로운 컴포넌트를 반환해주는 함수
React.memo= React에서 제공하는 고차 컴포넌트- 보통 컴포넌트를 React.memo에 인자로 받아, UI나 기능은 똑같으면서, 최적화된 컴포넌트를 반환해주는 함수
- 최적화된 컴포넌트는 렌더링될 상황마다
Props Check를 통해, 자신이 받는 Props가 변화가 있는지 없는지 체크함- 변화가 있다면 → 렌더링
- 변화가 없다면 → 렌더링X, 기존 렌더링된 내용을 재사용
- React.memo의 memo는? Memoization(메모이제이션)을 의미
- 맨 처음 값을 계산할 떄, 해당 값을 메모리에 저장해서, 필요할 때마다 또 다시 계산하지 않고
- 메모리에서 꺼내서 재사용을 하는 기법
- React.memo는 잘 사용하면 성능이 향상되지만, 무분별하게 사용한다면 오히려 성능이 저하됨!
- 왜냐하면 컴포넌트를 메모이징할 떄, 렌더링된 결과를 어딘가에 저장해야 되는데,
- 이떄 메모리를 추가적으로 소비하기 떄문
- React.memo를 사용하는 경우
- 컴포넌트가 같은 Props로 자주 렌더링 될 떄
- 컴포넌트가 렌더링될 떄마다 복잡한 로직을 처리해야 한다면
- React.memo는 오직 Props 변화에만 의존하는 최적화 방법
- 컴포넌트가 useState, useReducer, useContext같은 상태 관련 Hook이라면,
- Props 변화가 없더라도 state, context가 변할 떄마다 다시 렌더링됨
6.1 예제 1 : momo 사용 전
1import React from 'react'23export default function Child({ name, age }) {4console.log('👶자녀 컴포넌트가 렌더링이 되었어요.')56return (7<div style={{ border: '2px solid powderblue', padding: '10px' }}>8<h3>👶자녀</h3>9<p>name: {name}</p>10<p>age: {age}</p>11</div>12)13}
1import { useState } from 'react'2import Child from './Child'34export default function App() {5const [parentAge, setParentAge] = useState(0)6const [childAge, setChildAge] = useState(0)78const incrementParentAge = () => {9setParentAge(parentAge + 1)10}1112const incrementChildAge = () => {13setChildAge(childAge + 1)14}1516console.log('🧑부모 컴포넌트가 렌더링이 되었어요.')1718return (19<div style={{ border: '2px solid orange', padding: '10px' }}>20<h1>🧑부모</h1>21<p>age: {parentAge}</p>22<button onClick={incrementParentAge}>부모 나이 증가</button>23<button onClick={incrementChildAge}>자녀 나이 증가</button>24<Child name={'홍길동'} age={childAge} />25</div>26)27}
브라우저 콘솔 창을 확인해보면,
- 부모 나이가 증가(부모 컴포넌트가 렌더링)하면, 자식 컴포넌트도 렌더링됨
- 자식 나이가 증가(자식 컴포넌트가 렌더링)하면, 부모 컴포넌트도 렌더링됨
- 문제점: 렌더링할 필요없는 컴포넌트도 렌더링되고 있음
- 이를 React.memo로 해결할 수 있음
6.2 예제 1: momo 사용 후
- React.memo 사용법
- 최적화하려는 컴포넌트를 memo()로 감싸주면 됨
1import React, { memo } from 'react'23function Child({ name, age }) {4console.log('👶자녀 컴포넌트가 렌더링이 되었어요.')56return (7<div style={{ border: '2px solid powderblue', padding: '10px' }}>8<h3>👶자녀</h3>9<p>name: {name}</p>10<p>age: {age}</p>11</div>12)13}1415export default memo(Child) // React.memo 사용법 : 최적화하려는 컴포넌트 memo()로 감싸주기16// memo() : react에서 제공하는 고차 컴포넌트17// - 컴포넌트를 인자로 받아, props체크하는 최적화된 컴포넌트를 반환
6.3 예제 2 : useMemo + React.memo
useCallback + useMemo + React.memo를 사용하면 폭 넓은 최적화를 할 수 있음
6.3.1 React.memo만 적용한 경우
1import React, { memo } from 'react'23function Child({ name }) {4console.log('👶자녀 컴포넌트가 렌더링이 되었어요.')56return (7<div style={{ border: '2px solid powderblue', padding: '10px' }}>8<h3>👶자녀</h3>9<p>성: {name.lastName}</p>10<p>이름: {name.firstName}</p>11</div>12)13}1415export default memo(Child)
1import { useState } from 'react'2import Child from './Child'34export default function App() {5const [parentAge, setParentAge] = useState(0)67const incrementParentAge = () => {8setParentAge(parentAge + 1)9}1011console.log('🧑부모 컴포넌트가 렌더링이 되었어요.')1213// JS에서 오브젝트는 참조형 데이터로 메모리의 주소를 가리키고 있다.14// 함수안의 모든 변수는 렌더링될 떄, 초기화됨15// 그래서 name이라는 변수는 새로운 메모리 주소를 가리키고 있음16// Child 컴포넌트는 name이라는 변수가 새로운 메모리 주소를 가리키고 있기 때문에17// React.memo입장에서는 name이라는 변수가 변경되었다고 판단하고 렌더링을 한다.18const name = {19lastName: '홍',20firstName: '길동',21}2223return (24<div style={{ border: '2px solid orange', padding: '10px' }}>25<h1>🧑부모</h1>26<p>age: {parentAge}</p>27<button onClick={incrementParentAge}>부모 나이 증가</button>28<Child name={name} />29</div>30)31}
6.3.2 useMemo + React.memo 적용한 경우
- 어떠한 값을 메모이징하는 경우 사용
1import { useMemo, useState } from 'react'2import Child from './Child'34export default function App() {5const [parentAge, setParentAge] = useState(0)67const incrementParentAge = () => {8setParentAge(parentAge + 1)9}1011console.log('🧑부모 컴포넌트가 렌더링이 되었어요.')1213// useMemo를 사용하면, name이라는 변수가 새로운 메모리 주소를 가리키고 있어도14// name이라는 변수의 값이 같다면, React.memo는 name이라는 변수가 변경되지 않았다고 판단 후 렌더링을 하지 않는다.15// 즉, React.memo는 name이라는 변수가 변경되었는지를 판단하는 것이 아니라,16// name이라는 변수가 가리키고 있는 메모리 주소가 변경되었는지를 판단한다.17// 그래서 name이라는 변수가 가리키고 있는 메모리 주소가 변경되지 않았다면, React.memo는 렌더링을 하지 않는다.18const name = useMemo(() => {19return {20lastName: '홍',21firstName: '길동',22}23}, [])2425return (26<div style={{ border: '2px solid orange', padding: '10px' }}>27<h1>🧑부모</h1>28<p>age: {parentAge}</p>29<button onClick={incrementParentAge}>부모 나이 증가</button>30<Child name={name} />31</div>32)33}
6.4 예제 3 : useCallback + React.memo
6.4.1 React.memo만 적용한 경우
1import React, { memo } from 'react'23function Child({ name, tellMe }) {4console.log('👶자녀 컴포넌트가 렌더링이 되었어요.')56return (7<div style={{ border: '2px solid powderblue', padding: '10px' }}>8<h3>👶자녀</h3>9<p>이름: {name}</p>10<button onClick={tellMe}>엄마 나 사랑해?</button>11</div>12)13}1415export default memo(Child)
1import { useState } from 'react'2import Child from './Child'34export default function App() {5const [parentAge, setParentAge] = useState(0)67const incrementParentAge = () => {8setParentAge(parentAge + 1)9}1011console.log('🧑부모 컴포넌트가 렌더링이 되었어요.')1213// 부모 컴포넌트가 렌더링이 되면 자식 컴포넌트도 렌더링이 되는데,14// JS에서 함수는 객체의 한 종류입니다.15// 마찬가지로 tellMe()는 객체이기 때문에 메모리 주소가 들어있습니다.16// 그래서 컴포넌트가 렌더링될 떄마다, 자식 컴포넌트로 tellMe()를 다른 메모리 주소가 전달됩니다.17const tellMe = () => {18console.log('길동아 사랑해')19}2021return (22<div style={{ border: '2px solid orange', padding: '10px' }}>23<h1>🧑부모</h1>24<p>age: {parentAge}</p>25<button onClick={incrementParentAge}>부모 나이 증가</button>26<Child name={'홍길동'} tellMe={tellMe} />27</div>28)29}
6.4.2 useCallback + React.memo 적용한 경우
- useMemo : 어떠한 값을 메모이징하는 경우 사용
- useCallback : 어떠한 함수를 메모이징하는 경우 사용
1import { useCallback, useState } from 'react'2import Child from './Child'34export default function App() {5const [parentAge, setParentAge] = useState(0)67const incrementParentAge = () => {8setParentAge(parentAge + 1)9}1011console.log('🧑부모 컴포넌트가 렌더링이 되었어요.')1213// useCallback을 사용하면 자식 컴포넌트가 렌더링이 되지 않는다.14const tellMe = useCallback(() => {15console.log('길동아 사랑해')16}, [])1718return (19<div style={{ border: '2px solid orange', padding: '10px' }}>20<h1>🧑부모</h1>21<p>age: {parentAge}</p>22<button onClick={incrementParentAge}>부모 나이 증가</button>23<Child name={'홍길동'} tellMe={tellMe} />24</div>25)26}
7. Custom Hook (커스텀 훅)
React에서 제공해주는 Hook을 조합해서 사용하다보면, 중복된 코드들이 생길 수 있습니다. 그래서 이런 중복을 제거하기 위해서 개발자들은 자신들만의 입맛대로 Custom Hook을 만들 수 있습니다. Custom Hook안에서는 기존 React Hook들을 가져다 쓸 수 있습니다.
여기서는 useInput, useFetch라는 Custom Hook을 만들어 볼 것임. 자기 마음대로 Hook을 만들어 쓰세요.
7.1 Custom Hook만들기 : useInput
7.1.1 Custom Hook 적용 전
1import { useState } from 'react'23export default function App() {4const [inputValue, setInputValue] = useState('')56const handleChange = e => {7setInputValue(e.target.value)8}910const handleSubmit = e => {11alert(inputValue)12setInputValue('')13}1415return (16<>17<h1>useInput</h1>18<input type="text" value={inputValue} onChange={handleChange} />19<button onClick={handleSubmit}>확인</button>20</>21)22}
만약 여러 개의 컴포넌트가 있고, 컴포넌트마다 input값을 처리해줘야 한다면, 로직을 여러 컴포넌트마다 복사붙여넣기해야 합니다. 그렇게 되면 중복코드가 발생합니다. 그래서 로직을 Custom Hook으로 만들어 놓으면, 재사용성이 올라갑니다.
7.1.2 Custom Hook 만들기
hook/useInput.js를 만들어 원하는 로직을 함수 안에서 넣어줍니다.
1import { useState } from 'react'23export default function useInput(initialValue, submitAction) {4const [inputValue, setInputValue] = useState(initialValue)56const handleChange = e => {7setInputValue(e.target.value)8}910const handleSubmit = () => {11setInputValue('')12submitAction(inputValue)13}1415return [inputValue, handleChange, handleSubmit]16}
만든 Hook을 App컴포넌트에 적용하기
1import useInput from './hooks/useInput'23function displayMessage(message) {4alert(message)5}67export default function App() {8const [inputValue, handleChange, handleSubmit] = useInput('', displayMessage)910return (11<>12<h1>useInput</h1>13<input type="text" value={inputValue} onChange={handleChange} />14<button onClick={handleSubmit}>확인</button>15</>16)17}
7.2 Custom Hook 만들기 : useFetch
7.2.1 Custom Hook 적용 전
1import { useEffect, useState } from 'react'23// 더미 데이터 반환해주는 API - jsonplaceholder4const baseURL = 'https://jsonplaceholder.typicode.com'56export default function App() {7const [data, setData] = useState(null)89const fetchUrl = type => {10fetch(baseURL + '/' + type)11.then(res => res.json())12.then(res => setData(res))13}1415useEffect(() => {16fetchUrl('users')17}, [])1819return (20<>21<h1>useFetch</h1>22<button onClick={() => fetchUrl('users')}>Users</button>23<button onClick={() => fetchUrl('Posts')}>Posts</button>24<button onClick={() => fetchUrl('Todos')}>Todos</button>25<pre>{JSON.stringify(data, null, 2)}</pre>26</>27)28}
7.2.2 Custom Hook 만들기
hook/useFetch.js를 만들어 원하는 로직을 함수 안에서 넣어줍니다.
1import { useEffect, useState } from 'react'23export default function useFetch(baseURL, initialType) {4const [data, setData] = useState(null)56const fetchUrl = type => {7fetch(baseURL + '/' + type)8.then(res => res.json())9.then(res => setData(res))10}1112useEffect(() => {13fetchUrl(initialType)14}, [])1516return {17data,18fetchUrl,19}20}
만든 Hook을 App컴포넌트에 적용하기
1import useFetch from './hooks/useFetch'23// 더미 데이터 반환해주는 API - jsonplaceholder4const baseURL = 'https://jsonplaceholder.typicode.com'56export default function App() {7const { data: userData } = useFetch(baseURL, 'users')8const { data: postData } = useFetch(baseURL, 'posts')910return (11<>12<h1>User</h1>13{userData && <pre>{JSON.stringify(userData[0], null, 2)}</pre>}14<h1>Post</h1>15{postData && <pre>{JSON.stringify(postData[0], null, 2)}</pre>}16</>17)18}
[참고]
- [React 공식문서 Hooks API Referece](Hooks API Reference)
- 별코딩 유튜브