1. NestJS 소개
Nest (NestJS) is a framework for building efficient, scalable Node.js server-side applications.
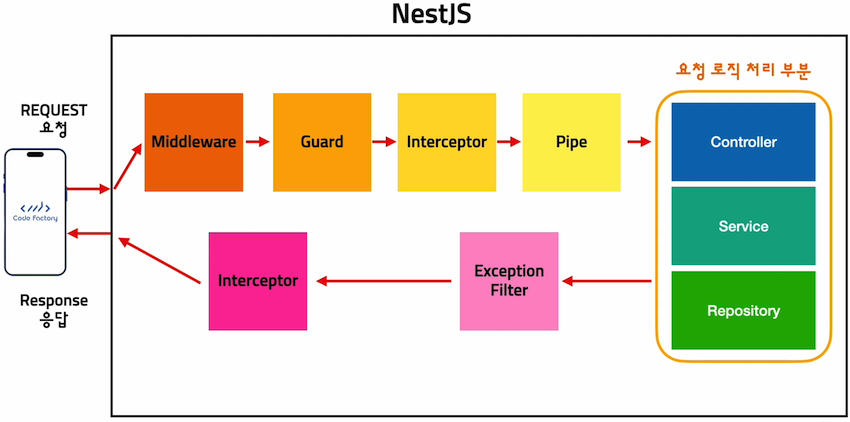
NestJS는 효율적이고 스케일링이 쉬운 NodeJS 서버를 만드는 프레임워크이다.
It uses progressive JavaScript, is built with and fully supports TypeScript
차세대 javascript를 사용하며, Typescript로 만들어졌으면 Typescript를 지원한다.
(yet still enables developers to code in pure JavaScript) and combines elements of OOP (Object Oriented Programming), FP (Functional Programming), and FRP (Functional Reactive Programming).
Under the hood, Nest makes use of robust HTTP Server frameworks like Express (the default) and optionally can be configured to use Fastify as well!
NextJS는 Express같은 견고한 HTTP 서버 프레임워크를 사용하고 있으며 원한다면 Fastify를 대신 사용할 수도 있다.
Nest provides an out-of-the-box application architecture which allows developers and teams to create highly testable, scalable, loosely coupled, and easily maintainable applications.
NestJS는 자체적으로 서버 아키텍처를 제공해준다. 그래서 테스트하기 쉽고, 디커플링이 잘 돼있고, 유지보수가 편한 서버를 제작하게 해준다.
— cf. Nest.js 공식문서 (https://docs.nestjs.com/)
2. Mac 환경설정
1$ node -v2v18.17.134$ npm -v59.6.767$ sudo corepack enable8Password:910$ npm -g install pnpm11$ pnpm --version129.4.01314$ yarn --version151.22.211617$ yarn --version181.22.211920$ sudo npm i -g @nestjs/cli
3. 기본 Node.js 서버
1// HTTP 모듈을 가져옵니다.2const http = require('http')34// 서버를 실행할 호스트를 지정 localhost -> 127.0.0.1 -> 서버를 실행한 컴퓨터5const host = 'localhost'67// 서버가 사용할 포트를 지정8const port = 3000910/** HTTP 서버를 생성11* req -> request -> 요청12* res -> response -> 응답13*/14const server = http.createServer((req, res) => {15// 응답의 상태 코드와 콘텐츠 유형을 설정16res.writeHead(200, { 'Content-Type': 'text/html' })17// 응답으로 HTML을 보낸다.18res.end('<h1>Hello World</h1>')19})2021// 서버를 실행합니다.22server.listen(port, host, () => {23// 서버가 실행 중임을 콘솔에 기록합니다.24console.log('server running on http://localhost:3000')25})
3.1 path별로 다른 응답 반환
1const http = require('http')2const url = require('url')34const host = 'localhost'5const port = 300067const server = http.createServer((req, res) => {8const path = url.parse(req.url).pathname910if (path === '/') {11res.writeHead(200, { 'Content-Type': 'text/html' })12res.end('<h1>Home Page</h1>')13} else if (path === '/post') {14res.writeHead(200, { 'Content-Type': 'text/html' })15res.end('<h1>Post Page</h1>')16} else if (path === '/user') {17res.writeHead(200, { 'Content-Type': 'text/html' })18res.end('<h1>User Page</h1>')19} else {20res.writeHead(200, { 'Content-Type': 'text/html' })21res.end('<h1>404 Page Not Found!</h1>')22}23})2425server.listen(port, host, () => {26console.log('server running on http://localhost:3000')27})
3.2 Express로 REST API 구현
1yarn init -y2yarn add express
express를 추가한다.
1// Express 모듈을 가져옵니다.2const express = require('express')34// Express 객체를 생성합니다.5const app = express()67/** 종류8* app.get()9* app.post()10* app.delete()11* app.put()12*/1314app.get('/', (req, res) => {15res.send('<h1>Home Page</h1>')16})1718app.get('/post', (req, res) => {19res.send('<h1>Post Page</h1>')20})2122app.get('/user', (req, res) => {23res.send('<h1>User Page</h1>')24})2526app.use((req, res) => {27res.status(404).send('<h1>404 Page Not Found!</h1>')28})2930// 서버를 시작합니다.31app.listen(3000, () => {32console.log('server running on http://localhost:3000')33})
node로 위 코드를 실행한다. 3.1절에서 express없이 쓴 코드와 비교해보면 훨씬 간단해진 것을 볼 수 있다.
3.3 NestJS로 Hello World
nest라고 명령어를 치면 도움말이 나온다.
1$ nest2Usage: nest <command> [options]34Options:5-v, --version Output the current version.6-h, --help Output usage information.78Commands:9new|n [options] [name] Generate Nest application.10build [options] [app] Build Nest application.11start [options] [app] Run Nest application.12info|i Display Nest project details.13add [options] <library> Adds support for an external library to your project.14generate|g [options] <schematic> [name] [path] Generate a Nest element.15Schematics available on @nestjs/schematics collection:16┌───────────────┬─────────────┬──────────────────────────────────────────────┐17│ name │ alias │ description │18│ application │ application │ Generate a new application workspace │19│ class │ cl │ Generate a new class │20│ configuration │ config │ Generate a CLI configuration file │21│ controller │ co │ Generate a controller declaration │22│ decorator │ d │ Generate a custom decorator │23│ filter │ f │ Generate a filter declaration │24│ gateway │ ga │ Generate a gateway declaration │25│ guard │ gu │ Generate a guard declaration │26│ interceptor │ itc │ Generate an interceptor declaration │27│ interface │ itf │ Generate an interface │28│ library │ lib │ Generate a new library within a monorepo │29│ middleware │ mi │ Generate a middleware declaration │30│ module │ mo │ Generate a module declaration │31│ pipe │ pi │ Generate a pipe declaration │32│ provider │ pr │ Generate a provider declaration │33│ resolver │ r │ Generate a GraphQL resolver declaration │34│ resource │ res │ Generate a new CRUD resource │35│ service │ s │ Generate a service declaration │36│ sub-app │ app │ Generate a new application within a monorepo │37└───────────────┴─────────────┴──────────────────────────────────────────────┘
nest로 새 서버를 만들어보자
1nest new nestjs_server23# yarn 선택4# 해당 폴더 위치로 이동
app.controller.ts 파일을 수정해줍니다.
1import { Controller, Get } from '@nestjs/common'2import { AppService } from './app.service'34@Controller()5export class AppController {6constructor(private readonly appService: AppService) {}78@Get()9getHome() {10return 'Home Page'11}1213@Get('post')14getPost() {15return 'Post Page'16}1718@Get('user')19getUser() {20return 'User Page'21}22}